
With the Employee Timesheet application, employees can log in to add their hours for the day and view past time-sheets. A supervisor can manage his employees, projects, activities, and cost centers. An employee can have either an employee or a supervisory role.
This project is another great example of combining roles with an online database to make a really functional app. It could be extended to track any additional information you would want to record.
System Requirements
The Employee Timesheet application requires the standard commercial phpGrid license as it needs several key features such as the latest time-only picker and group summary.
• PHP 5.6+
• MySQL / MariaDB
• phpGrid
The Components of the Employee Timesheet System
An employee timesheet system has several components. The primary component is obviously the Timesheet, but the system requires other entities to work together with it for companies, firms and agencies to effectively collect, manage, track and share records about Projects, Employees, Timesheets, Activities and Cost Centers.
• Timesheet
• Employees
• Projects
• Activities
• Cost Center
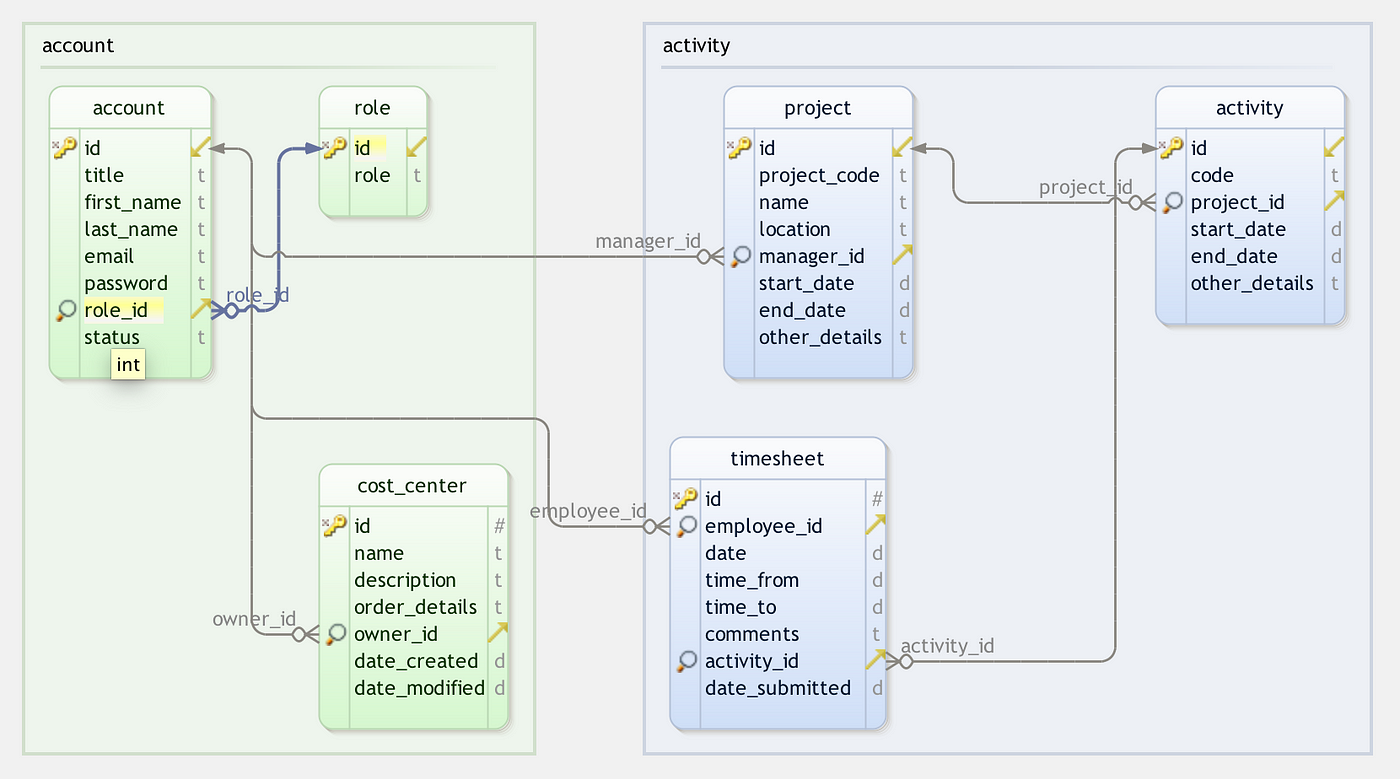
Database Diagram
Typically, a timesheet system has four basic elements — cost center, project, activity, and lastly, the timesheet for time entry. Most employees will only have permission to access their own time entries, but managers/supervisors have access to all aspects of the timesheet database including the cost center and projects.
Setting up the Database
Download the employee-timesheet.sql SQL script from this tutorial’s GitHub repo, and then execute the script using a MySQL tool such as MySQL Workbench. The .sql files are in the db folder. This will create a new database named employee-timesheet as well as the tables needed for this tutorial.
Set up phpGrid
We will use a datagrid component by phpGrid to handle all internal database CRUD (Create, Remove, Update, and Delete) operations.
Be sure to obtain a copy of phpGrid before you proceed (the free version can work but the timepicker and grouping features required for this application are only available in the paid version).
To install phpGrid, follow these steps:
- Unzip the phpGrid download file.
- Upload the phpGrid folder to the phpGrid folder.
- Complete the installation by configuring the conf.php file.
Before we begin coding, we must include the following information in conf.php, the phpGrid configuration file.
1 2 3 4 5 6 | define('PHPGRID_DB_HOSTNAME', 'localhost'); // host name define('PHPGRID_DB_USERNAME', 'root'); // database user name define('PHPGRID_DB_PASSWORD', ''); // database password define('PHPGRID_DB_NAME', 'employee-timesheet'); // our donation manager database name define('PHPGRID_DB_TYPE', 'mysql'); // database type define('PHPGRID_DB_CHARSET','utf8'); // always 'utf8' in MySQL |
Creating UI
The Timesheet application has only two pages:
The supervisor page will also have access to other database tables via tabs. We will discuss those later in the tutorial.
Dashboards

Timesheet Dashboard (Employee)
Let’s start with the timesheet dashboard page for the employee.
The page is composed of one datagrid populated with data sourced from the timesheet table.
If you have read the tutorial Building a Donation Manager from Scratch, or the Inventory Management Application tutorial, you will have no problem following the code below.
1 2 3 4 5 6 7 8 9 10 11 12 13 14 15 | $dg = new C_DataGrid("SELECT * FROM timesheet", "id", "timesheet"); $dg -> set_query_filter("employee_id = '1'"); $dg -> set_col_hidden('id, employee_id', false); $dg -> set_col_edittype("activity_id", "select", "Select id, code from activity")->set_col_title('activity_id', 'Activity'); $dg -> set_col_time("time_from")->set_col_property("time_from", array("formatter"=>"date", "formatoptions"=>array("srcformat"=>"h:i A","newformat"=>"h:i A"))); $dg -> set_col_time("time_to")->set_col_property("time_to", array("formatter"=>"date", "formatoptions"=>array("srcformat"=>"h:i A","newformat"=>"h:i A"))); $dg -> enable_edit('FORM')->enable_autowidth(true); $dg -> display(); |
Let’s break our code down for a quick review.
The first line has a simple SQL Select statement that uses the database table timesheet as the datasource that will populate the datagrid in the dashboard.
Here we used set_query_filter() and hard coded the employee id for demo purposes only. In a real-world application, you would replace it with a user id which was authenticated through a login.
We hid certain fields from our grid id, and employee_id with set_col_hidden().
We made the activity field a dropdown by setting the type to select in set_col_edittype() so it could be used as a look up for Activity table.
Finally, note the use of the set_col_time() function used to enable our time-picker, followed by the formatter function so that the time is set to the right value during edit. The fields must be the TIME type in MySQL.
That’s it for the employee timesheet dashboard. Here’s what it looks like:
Timesheet Dashboard (Supervisor )
The supervisor dashboard is just slightly more complex than the employee dashboard. For this page, we will use a technique called tabbed grids from phpGrid to display a datagrid populated with data sourced from other database tables — all without refreshing the page.
The complete code:
1 2 3 4 5 6 7 8 9 10 11 12 13 14 15 16 17 18 19 20 21 22 23 24 25 26 | $dg = new C_DataGrid("SELECT id, employee_id, date, time_from, time_to, ROUND(TIMESTAMPDIFF(MINUTE, time_from, time_to)/60, 2) as hours, comments, activity_id, date_submitted FROM timesheet", "id", "timesheet"); $dg -> set_col_hidden('id', false); // hide aggregate field hours from the edit form $dg->set_col_property('hours', array('editable'=>false,'hidedlg'=>true)); $dg -> set_col_edittype("employee_id", "select", "Select id, last_name from account")->set_col_title('employee_id', 'Employee'); $dg -> set_col_edittype("activity_id", "select", "Select id, code from activity")->set_col_title('activity_id', 'Activity'); $dg -> set_col_time("time_from")->set_col_property("time_from", array("formatter"=>"date", "formatoptions"=>array("srcformat"=>"h:i A","newformat"=>"h:i A"))); $dg -> set_col_time("time_to")->set_col_property("time_to", array("formatter"=>"date", "formatoptions"=>array("srcformat"=>"h:i A","newformat"=>"h:i A"))); $dg -> enable_edit('FORM')->enable_autowidth(true); $dg -> set_group_properties('employee_id', false, true, true, false)->set_group_summary('hours', 'sum'); $dg -> display(false); $grid = $dg -> get_display(false); $dg -> display_script_includeonce(); |
Now, let’s dissect the code.
The first line uses an SQL statement with a generated column named hours which is used to compute the time difference between time_from and time_to. We will need this value later to sum the total hours once they have been grouped by employee.
1 |
Because hours is a generated column, we must hide it from the edit form.
1 |
We group the timesheet by the employee and summarize the total number of hours he/she worked.
1 | $dg->set_group_properties('employee_id', false, true, true, false)->set_group_summary('hours', 'sum'); |
Lastly, we don’t render the datagrid right away. Instead, we set the display to false and render the datagrid with the tabbed grid loader using the aforementioned tabs. The beauty of using a tab is that we don’t need to write datagrid code for each of the five tables used in our application — all we need to do is to simply replace the table name.
1 2 3 4 5 6 7 8 9 10 11 12 13 14 15 | <div id="tabs"> <div id="tabs-1" style="padding:0"> <?php echo $grid; ?> </div> <ul> <li><a href="#tabs-1">Timesheets</a></li> <li><a href="tabbed_grid_loader.php?gn=account">Employees</a></li> <li><a href="tabbed_grid_loader.php?gn=activity">Activities</a></li> <li><a href="tabbed_grid_loader.php?gn=cost_center">Cost Center</a></li> <li><a href="tabbed_grid_loader.php?gn=project">Projects</a></li> <li style="background:transparent;border:0;"><a onclick="location.href='https://getzenbase.com'" href="https://getzenbase.com" target="_new" style="padding:0;padding-left: 10px;" rel="noopener"><img src="assets/images/zenbase-logo.png" width="85"></a></li> </ul> </div> |
Here’s a screenshot of our Supervisor Dashboard. Notice the hours group summary by the employee and the bottom tabs to other tables.
Summary
This tutorial builds a simple and extendable timesheet system using a minimal amount of code thanks to the phpGrid component which handles the bulk of the CRUD plumbing.
Now, there you have it. Your just built your employee timesheet application from scratch using only PHP and MySQL!
Timesheet Demo